Tuesday, August 13, 2013

Sunny Fun

Hello crafty pals! We are in the midst of summer, so when I saw the current sketch challenge over at Peachy Keen Challenge, I immediately thought of the sun peeking up over the clouds. But I have this habit of not changing up sketches and the sketch showed stars...the sun peeking up with stars just didn't seem right. However, I thought I'd see what I could come up with. I got out the PK-SOTM June 2013 and got to work. Here is what I came up with:
What I LOVE about this card is the stamped Fun in the Sun. First, I stamped it in white. After letting the white dry, I stamped it again in brown but a bit to the right. This created a shadowed look. I'll have to try this again on another project. Also, the big sea star is on an action wobble. Cool, right?

No... I still wasn't happy with my card. I decided to get out some of my Get Inky! Stamps and create a better looking card for this challenge while thinking outside the actual look of the sketch. 

There's these beautiful whimsical clouds on two of the GI sets. And the sun needed some help too...oooh...my Market Street background stamp would be perfect.

So with PKS, Market Street, and Get Inky...
Closer...This is more of what I had in mind, but its not as clean as I'd hoped. I was trying to make this card in under 10 minutes...not such a good idea for me. I was so stressed by this, that I kept dropping pieces. Even big pieces with glue on them straight onto the wrong places of the card (hubby was showing me something at the time so my attention wasn't completely on card making). So needless to say, there are many unnecessary layers on this card to cover up my oopses. If you look closely, you will see em. :0(

So that's what I have as of now. If I get another one done tonight I will add it. I am determined to make a cute sun card with this sketch.


Thanks for stopping by! Have fun and be good, crafters!


Sunday, August 11, 2013

Denami Sweet and Simple Hop

(If you are here for the Get Inky 2013 Spooktacular Halloween Hop,
please click HERE)

Welcome DeNami hoppers!
I am so excited to be able to join this Sweet and Simple Hop!!!
It is my first DeNami hop, and I'm looking forward to many many more!

You should be arriving to me from the wonderful Wendy.
If so, great! If not, please visit the DeNami Blog for the complete line up
or to get back on track!

DeNami has prizes for you to win (see their blog for details HERE) and guess what,
I have candy for you too! For those of you wanting chocolate,
sorry... it's not THAT type of candy :0)
Blog candy makes hopping sooo much more fun...doesn't it?!!
 *winner pays for shipping costs via PayPal emailed invoice,
which is roughly $2-12 depending upon where you live...I'm in the US

To be eligible for a chance to win, here's what you do...
-Follow my blog (if you aren't doing so already)
- Leave me a comment

I am so very excited to have recently discovered
 DeNami Designs Stamps,
that I already have a HUGE wish list!!!
I can't wait until the next time
I add to my already quickly growing collection of their adorable stamps!
(If you have a favorite stamp that you think I should put on the list,
please leave a comment and let me know!)

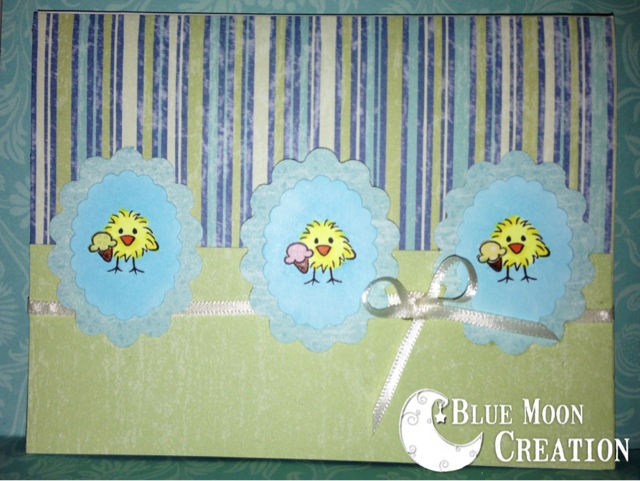
Here is what I designed for this Sweet and Simple hop,
using the first three stamps that I purchased from DeNami...
A close up of the adorable little chicks...
Yes, the chick that is standing there (hahaha...no pun intended)
has a butterfly "bow" on her head! I used the adorable
Chickie with Butterflies stamp (found HERE)
and just inked the parts that I wanted to use. Then I cut out one of the
butterflies to use as a bow. Creative, eh?
To get them all sparkly, I fussy cut the chicks, used some double sided adhesive
with microfine glitter and then colored over the glittered image with my Copics.

The background is from the stamp set that I am offering as blog candy today (Get Inky! Stamps by Blue Moon Creation found HERE).
I just stamped the image in a repeated pattern to make my own background paper
(something I learned at my first visit to a DeNami hop a few months ago).
I thought the image went well with the Computer Chickie (found HERE).
Don't you think so too?

Okay, so I couldn't stop at one card...I had to use the other stamp that I received
with my first purchase as well. Here is what I came up with...
I just love these cute chickie stamps (Chickie with Ice Cream found HERE)!
I paper pieced the ice cream using pattern paper to give them each a different  look.
The entire oval is colored using Copics, minus the ice cream. A Sweet and Simple card...right?

I hope you've enjoyed your stop here along the hop! I sure enjoyed having you!
So please feel free to come back again!

Okay... I'm having so much FUN,
I hate to see you go, but I must send you on your way...
Your next stop on the hop is the talented Ruza


Thursday, August 8, 2013

Get Inky Stamps Spooktacular Blog Hop


YIPPEE YAY!!! Welcome to the GI 2013 Halloween Spooktacular Blog Hop and Sale!!!

During your hopping journey, you will be partying with the Get Inky Design Team
and viewing some very amazing creations! They are such a talented group!
I am so grateful to have them as a part of the Get Inky Team!
And we are all so THANKFUL to have YOU here with us!

THIS weekend only (starting NOW through Sunday the 11th at 11:59pm PST) we will be
taking 20% off of your ENTIRE order at our Etsy Shop!!!
No minimum purchase required, just use
coupon code 2013SPOOKTACULAR20 upon checking out.
Click HERE to shop.

TREATS (provided you follow the rules):
One lucky winner will receive the 2013 Halloween Spooktacular Stamp Set
(value $27.99, winner is responsible for shipping charges and will be billed via PayPal emailed invoice).
*To be eligible to be in the drawing for this set, you must complete these 2 easy steps...

- Follow ALL blogs along the hop if you aren't doing so already.
- Comment on EVERY blog post along the hop.

We also have three $15 gifts to our Etsy shop!!!

* To be eligible for one of these prizes, you must...
-Follow ALL blogs along the hop if you aren't doing so already.
-Comment on ONE blog post.

Winners will be announced on Wednesday August 14, 2013 on the Get Inky Stamps Blog.


Here is the complete line up, should you become lost along the way...


As some of you may know, I've been busy making BOO Bags for my friends and neighbors for Halloween. For those of you not familiar with BOO Bags, let me explain...

For some Halloween fun, you pick 3 friends, neighbors, or co-workers that you are going to "BOO"
this means you leave them a special treat but you don't tell them who it's from.

(Side note: The first time I ever received one, I ended up finding out it was from a family member because I had mentioned I received an edible item on my porch without any info as to who it was from and I was hesitant to consume it...lol...a bit paranoid, yes, that's me....LOL. Since then, I had taken it upon myself to create these for my co-workers, trying to bring fun into the office. But I am no longer employed there.
Boy, do I miss those days...)

So you pick 3 to BOO. In your BOO bag/package, you must include the following:
- TREAT (But you probably figured this one out yourself.)
- Cute note/poem (GI's 2013 Halloween Spooktacular stamp set has this poem for you)
- Directions on what to do now that you've been boo-'ed (another item in stamp set
and BOO-ed recipients are given my permission to photocopy my stamps for this use)
- 2 BOO pictures...one says BOO and other says "I've been Boo-ed!" (Keep it simple since recipient needs to make 3 copies of this one...yes, normally one would not photocopy stamped images due to copyright violation, however...this is the ONLY time I am giving permission and allowing photocopies of my Halloween stamps to be used for this purpose only :0)
(Lot's of cute stamps in this set for many creations!!!)


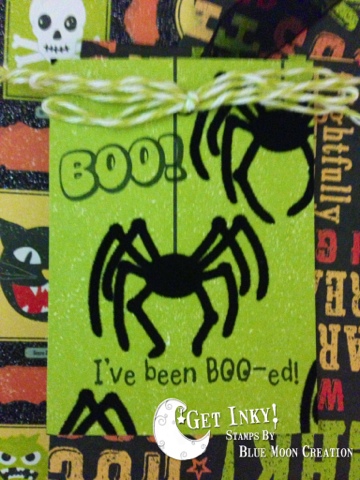
The back of my bag with the directions and the I've been BOO-ed pic...
I stamped the image on Neenah card stock and colored it in with Copics.
For the spider webs, I'd stamp twice per inked stamp. I used my Glaze pen on the spider.
I love how this came out! Sooo fun!
 Close up...
The BOO pic for recipient to display so others will know that the person has been boo-ed...

The little "bag" was easy to make. It was from a 6x12 inch card stock. One end I scored at one inch and the other end at a half inch. Then I scored the center (after having folded the edges up) to create the little "bag".
Here is what the bag looks like prior to closing... 
Here is inside of bag closed...
I used Tombow glue and double sided tape (tape helps plastic bag stick in, along with a few glue dots). I also used a punch for the bagged candy to show through. Using Nestabilities shapes, I created the area for my image. the cute little Halloween saying was made by me for Get Inky Stamps. (To order click HERE. Don't forget to use coupon code 2013SPOOKTACULAR20 for 20% off your ENTIRE ORDER!!!) Then I punched a few holes for a ribbon handle and tied a bow. I added gems to the scallop and...Viola! Done. Easy peasy and FUN too....right?!!

Don't forget to follow my blog...if you are not already one of my lovely followers :o)
And pleeaseee...leave me some "love" (comments), I love reading them and promise to respond to you!

Okay, I think I kept you here long enough...go on,
have some more fun...next up is our talented ASHLEY
who will inspire you with her amazing creation!


Wednesday, August 7, 2013

Peachy Keen Stamped BOO Bag w/GI Sneak Peek


Hi Peachy Pals and crafty friends, just last week I finally ordered last years Sept SOTM Halloween set and with Halloween on my mind, I couldn't wait to use it along with my GI Stamps for the Anything Goes Challenge at Peachy Keen. Here is a Halloween BOO Bag I created (If you haven't heard of these, come back on Friday for the Get Inky Halloween Spooktacular Blog Hop when I will talk more about these bags and you will see the latest GI Stamp Set with a Halloween theme)...but shh, this picture contains a stamp from that set that has yet to be released!!! To order said set, click HERE.)...okay, here it is...are you ready for some cuteness? I am, so I'll quit stalling on ya...
Cute, isn't it? It'll be hard to part with it when the time comes. 
Here's the back of the bag...

I hope you enjoyed this Peachy BOO bag! Don't forget to come and hop along with the GI Design Team starting on Friday, yes, this Friday! Tricks and Treats for the Get Inky Halloween Release! And on Sunday, I will be hopping with Denami Designs! So come back then too! 

Until next time, be good crafters!

Tuesday, August 6, 2013

Denami Stamped Halloween Boo Bag w/GI Sneak Peek

Last month I discovered Denami Designs Stamps (thanks to a Design Team Member of mine...I wont name names...ah-hem...La-Vie) and I just love them!!!! I already have 6 of their adorable stamps and will soon be ordering more off my wish list. 

Being that my mind is currently on Halloween, thanks to the Operation Write Home Halloween deadline and the new Get Inky Release this Friday, I just had to use my new Denami Halloween Stamp that arrived in the mail a few days ago.

I love BOOing my friends and neighbors for Halloween and thought I'd use this Halloween inspired time to create a BOO Bag (for those of you not familiar with BOO Bags, please do check back on Friday during the Get Inky's 2013 Halloween Spooktacular Blog Hop August 9th-11th and you will learn all about them and see a wonderful new stamp set...you wont want to miss it!)

Oh and, shhh...along with the Denami stamp there is a stamp from the Get Inky Halloween Stamp Set that has not been released yet. So YOU get a SPECIAL SNEAK PEEK! Check out how cute this BOO treat bag is...


Here is a close up of the adorable Denami image, which you can purchase HERE.


I stamped the image on Neenah card stock and colored it in with Copics. I love how cute these chicks are! Sooo adorable!

The little "bag" was easy to make. It was from a 6x12 inch card stock. One end I scored at one inch and the other end at a half inch. Then I scored the center (after having folded the edges up) to create the little "bag".


I used Tombow glue and double sided tape (tape helps plastic bag stick in, along with a few glue dots). I also used a punch for the bagged candy to show through. Using Nestabilities shapes, I created the area for my image. the cute little Halloween saying was made by me for Get Inky Stamps. (It will be on the set that is being released on Friday, to pre-order click HERE.) Then I punched a few holes for a ribbon handle and tied a bow. I added gems to the scallop and...Viola! Done. Easy peasy. 

That's all for now! Thanks for stopping by! Don't forget to come back on Friday for the Spooktacular Blog Hop! And again on Sunday, for the Denami Sweet and Simple Hop (my first time hopping with them...I'm so excited, that I created a few cards to share with you for then).

Until next time...be good crafters!