Thursday, December 17, 2015

Sweet 16 Birthday Hop for Emily


Hi friends!! Welcome! Thank you for joining us as we celebrate Emily's recent Sweet 16th Birthday! We are thankful that you've joined us to celebrate this sixteenth birthday of a fun and loving young lady. She will be blessed by your participation, comments, and all of the wonderful designs.
You should be arriving from Shawnee's blog. If so, that's GREAT! If not, please check out the bottom of my blog post for the complete list of the blog line-up.

Here's my Birthday design:
I created a 4 Bar Pocket Card with a birthday bookmark.

What is a Birthday Blog Hop without candy? If you are a follower of The Crafty Scrap Yard, just leave a comment here on my blog, along with the other blogs in today's hop to be entered to win TWO sets of Cardz TV stamp sets! "Make A Wish" and "Girl Talk"...both sets will help you celebrate a birthday celebration for a girl in your life!

Remember...some of the other designers along the hop are also giving away blog candy too, so don't forget to visit everyone, read carefully and become a follower of all blogs, and leave some comment love! 

The Crafty Scrap Yard will use random.org to pick a winner and will announce the winner on Wednesday, Dec 23rd, 2015.

Here at Blue Moon Creation Crafting Station, I will be giving away blog candy to some lucky hoppers too! Seven lucky hoppers will win a 6 month Membership to the Crafting Station! What's that you ask? What does being a member get you? Monthly digital images, inspirational sketches, and more!!! The winner will be picked on Wednesday December 30th when I announce some BIG NEWS! All comments must be in by December 23rd, 2015 to be eligible to win the prize. Contest void where prohibited.
                                                                  
"Your next stop along the hop is at the crafty Ellen's blog."

Here's the line-up for "Emily's Surprise 16th Birthday" Blog Hop! If you get lost while hopping come back here to check the list and find your way again!
  1.  Beth
  2. Mary
  3. Shawnee
  4. YOU ARE HERE
  5. Ellen
  6. Janis
  7. Jennifer
  8. Rachelle
  9. Krystal
  10. Cathy
  11. Connie
  12. Maria
  13. Jessica D.
  14. Georgia
  15. Julie
  16. Barbara
  17. Jessica P

Monday, December 7, 2015

Sweet 16 Blog Hop Invitation

The Crafty Scrap Yard is hosting a blog hop on December 18th! Blog candy will be available! So MARK your CALENDARS for this special EVENT that YOU don't want to MISS!

Sunday, November 29, 2015

Robin's Nest Dew Drop Christmas Card

As many of you know, I love Dew Drops from The Robin's Nest. Well today, I'd like to inspire you to use these Dew Drops on YOUR cards!

Let's make a Christmas Card:
Supplies Needed
Card Base (Mine is 4 Bar size)
Red Cardstock cut at 3.25 x 4.75
White Cardstock cut at 3 X 4.5
The Robin's Nest Dew Drops in green (Grapes and Leaves is the collection that I pulled my greens out of, and it has a great green combo to choose from), 7 Red Metallic Dew Drops, & 2 Brown Dew Drops from their Sunflower collection
Spiced Sunshine Stamps (Background Splatter and Sentiment)
Tim Holtz Thinlits Alterations Dies Tree and Star
Lawn Fawn Paper & White Cardstock for tree and star
Copic Marker Y06 and Spica Yellow Glitter Pen for the star
Glue dots in chunky and medium size
Tombow Glue
Red Tulle

Directions:

1.Die Cuts
2. Gather Other Supplies
3. Stamp Card Base with sentiment then background splatter top corner, bottom opposite corner
and then stamp center
4. Cut tulle with jagged edges smaller than the length of your card (as shown)
use chunky size glue dots to adhere the tulle
gather in center in accordion style, then place onto the chunky glue dots
using medium glue dots, stick the layers together so they lie flat
5. Measure tree against tulle and snip tulle at base of tree but not all the way across...cut piece off to make room for trunk
6. Using Tombow Glue, adhere layers to card base.


7. Apply glue and Dew Drops to tree as shown
8. Using Spica Glitter Pen draw two small brown circles to make Dew Drop trunk SPARKLE
and adhere Sunflower Dew Drops with Tombow Glue
9. Using Copic Y06 color the star and then color over it with your yellow Spica Glitter Pen
cut tiny pieces of double sided foam adhesive to attach to card at top of tree

And VIOLA!

One BLINGED out fun Christmas Card with Dew Drop dimension thanks to The Robin's Nest!

*Tip: If you only have clear Dew Drops, no worries!!! You can COLOR them with your Copic Markers!

Thanks for stopping by! If you make one of these cards, please post it over on the Crafting Stations Facebook Page! Thanks!

Now go get YOUR craft on!

Saturday, October 24, 2015

Crafty Card Gallery FALL Blog Hop

Welcome to the Crafty Card Gallery Fall themed blog hop!


We have 9 very talented card makers who have each designed a FALL themed card.

If you’ve never done a HOP before, it’s a group of bloggers that have joined together for a special theme. You "hop" from blog to blog using the links in each post. 

Be sure to visit each of the blogs, and then comment on the posts, as well as follow their blogs.  Some of us bloggers are giving away prizes - so you want to be sure to comment in order to be eligible to win.  

You should have arrived from: Francine

If you didn’t, please go back to the start so you can do the entire hop: http://craftycardgallery.blogspot.com/

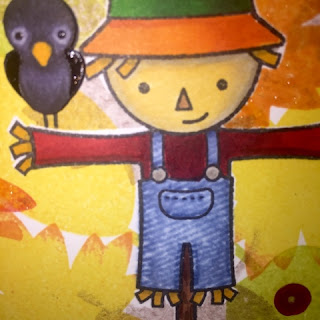
Helloooo Hoppers! I'm Thia! I created this fun Fall card using second generation stamping, along with a masking technique using my Lawn Fawn and Peachy Keen Stamps. The leaves and scarecrow are on one piece of paper. The crow I fussy cut and used double sided foam adhesive to add dimension. My son was watching me create the card (he's always a good listener when it comes to my card making :0) so, I mentioned it was missing something). He responded with glitter on the leaves, make them sparkle! Gotta love that kid, he was right, that's EXACTLY what I forgot! I am always putting glitter on and sealing it in with clear glaze pens! Can you see the glitter?

I'm a fan of Copic markers, so that's what I used to color the crow and his scarecrow friend. I also like to try fun techniques with my Copics so this time I cut up an old pair of jeans to give the overalls a jeans look. I did this by coloring his overalls and then putting some blender solution onto a patch of the cut up jeans. I held it on top of my image for a few seconds and Viola! Pretty neat, huh?

Here's a peek at the inside...

And the final card:

If you would like to be entered to win a Blue Moon Creation Crafting Station prize box (small flat rate box stuffed with crafty fun), be sure to follow my blog, leave me a comment here, like my Blue Moon Creation Crafting Station Facebook page, follow me on Twitter and on Pinterest. Doing all of those will get you the most entries. The winner will be notified on all media locations and will have 1 week to contact me to claim their prize. Contest ends on October 31, 2015 at 11:59 pm. Void where prohibited. Must be a resident of the USA for the prize box, if not a US resident, you will receive digital image downloads from Spiced Sunshine Digis.

Thanks for joining us in the hop!

Your next stop in the hop is: CARLA

Here’s the full list in case you get lost:


Kerin Sylvester   www.onecraftycorner.com


Shawnee Penkacik  http://www.sunshinythought.com


Saturday, October 10, 2015

Monster Cards Quick and Easy

Step 1: Colored Card Stock Base. Fold paper in half to desired size. 
Step 2: Diecut Banner As Teeth. Glue on.
Step 3: Google Eyes. Glue on 1, 2, or 3 eyes.
Step 4: White Cardstock Insert (measures half the size of the Cardstock base you used). Leave blank or add sentiment of Halloween, Birthday, Get Well, etc... Glue to inside of card.
Step 5: I said it was quick and easy, didn't I?

Sunday, September 20, 2015

Flutterby Butterfly Fun

Hi! I am so excited that folks are interested in my butterfly cards! I've been busy creating them, so I thought I'd share them with all of you, in hopes of inspiring you!
The butterflies are from Lawn Fawn and so are the flowers on the bottom two cards. The flowers on the top card are from a freebie in a magazine that I recently purchased. I'm having so much fun creating these coloring book style cards! Masking is so easy...once you get the hang of it! Your turn now...go get crafty!


Friday, September 18, 2015

2015 Division Winner at OC Fair


I just have to show you all my accomplishment over the summer! I won first place AND Division Winner! I can cross this off my bucket list! Next thing I'd like to accomplish is getting published in a big, well known magazine! I think I'll create other fun cards like this one! Have fun and keep crafting!

Saturday, August 29, 2015

Vintage Mermaids

A friend challenged me to create a vintage mermaid card. This fun shaker card was what I came up with. For those of you who know me, vintage is not my usual style. My friend loved the card. Phew!