Wednesday, November 26, 2014

Handmade Birthday Card Order

Hi everyone! Happy Thanksgiving to all of you! Today is like to share some birthday cards that I quickly crafted for my friend down the street. I'm thankful for her for many reasons, along with the fact that she hires me to make her greeting cards. I love that! So, here's what I came up with for her last night (using my Peachy Keen Stamps)...
I hope the recipients like them as much as she does! Thanks for stopping by!


Monday, October 6, 2014

WCMD 2014 Spiced Sunshine Stamps and Lawn Fawn Papers

Thia here to share with you a card I created for World Card Making Day 2014, using Lawn Fawn papers and Spiced Sunshine Stamps. This is a fun fold card, as it starts out as an 8 inch square but folds into a 4 inch card. I will include the instructions on how to create this card at the end of this post.
This is a picture of the opened card showing the front and back sides of the card. Let's take a look at the inside...
Here's a closer look at the individual sections...
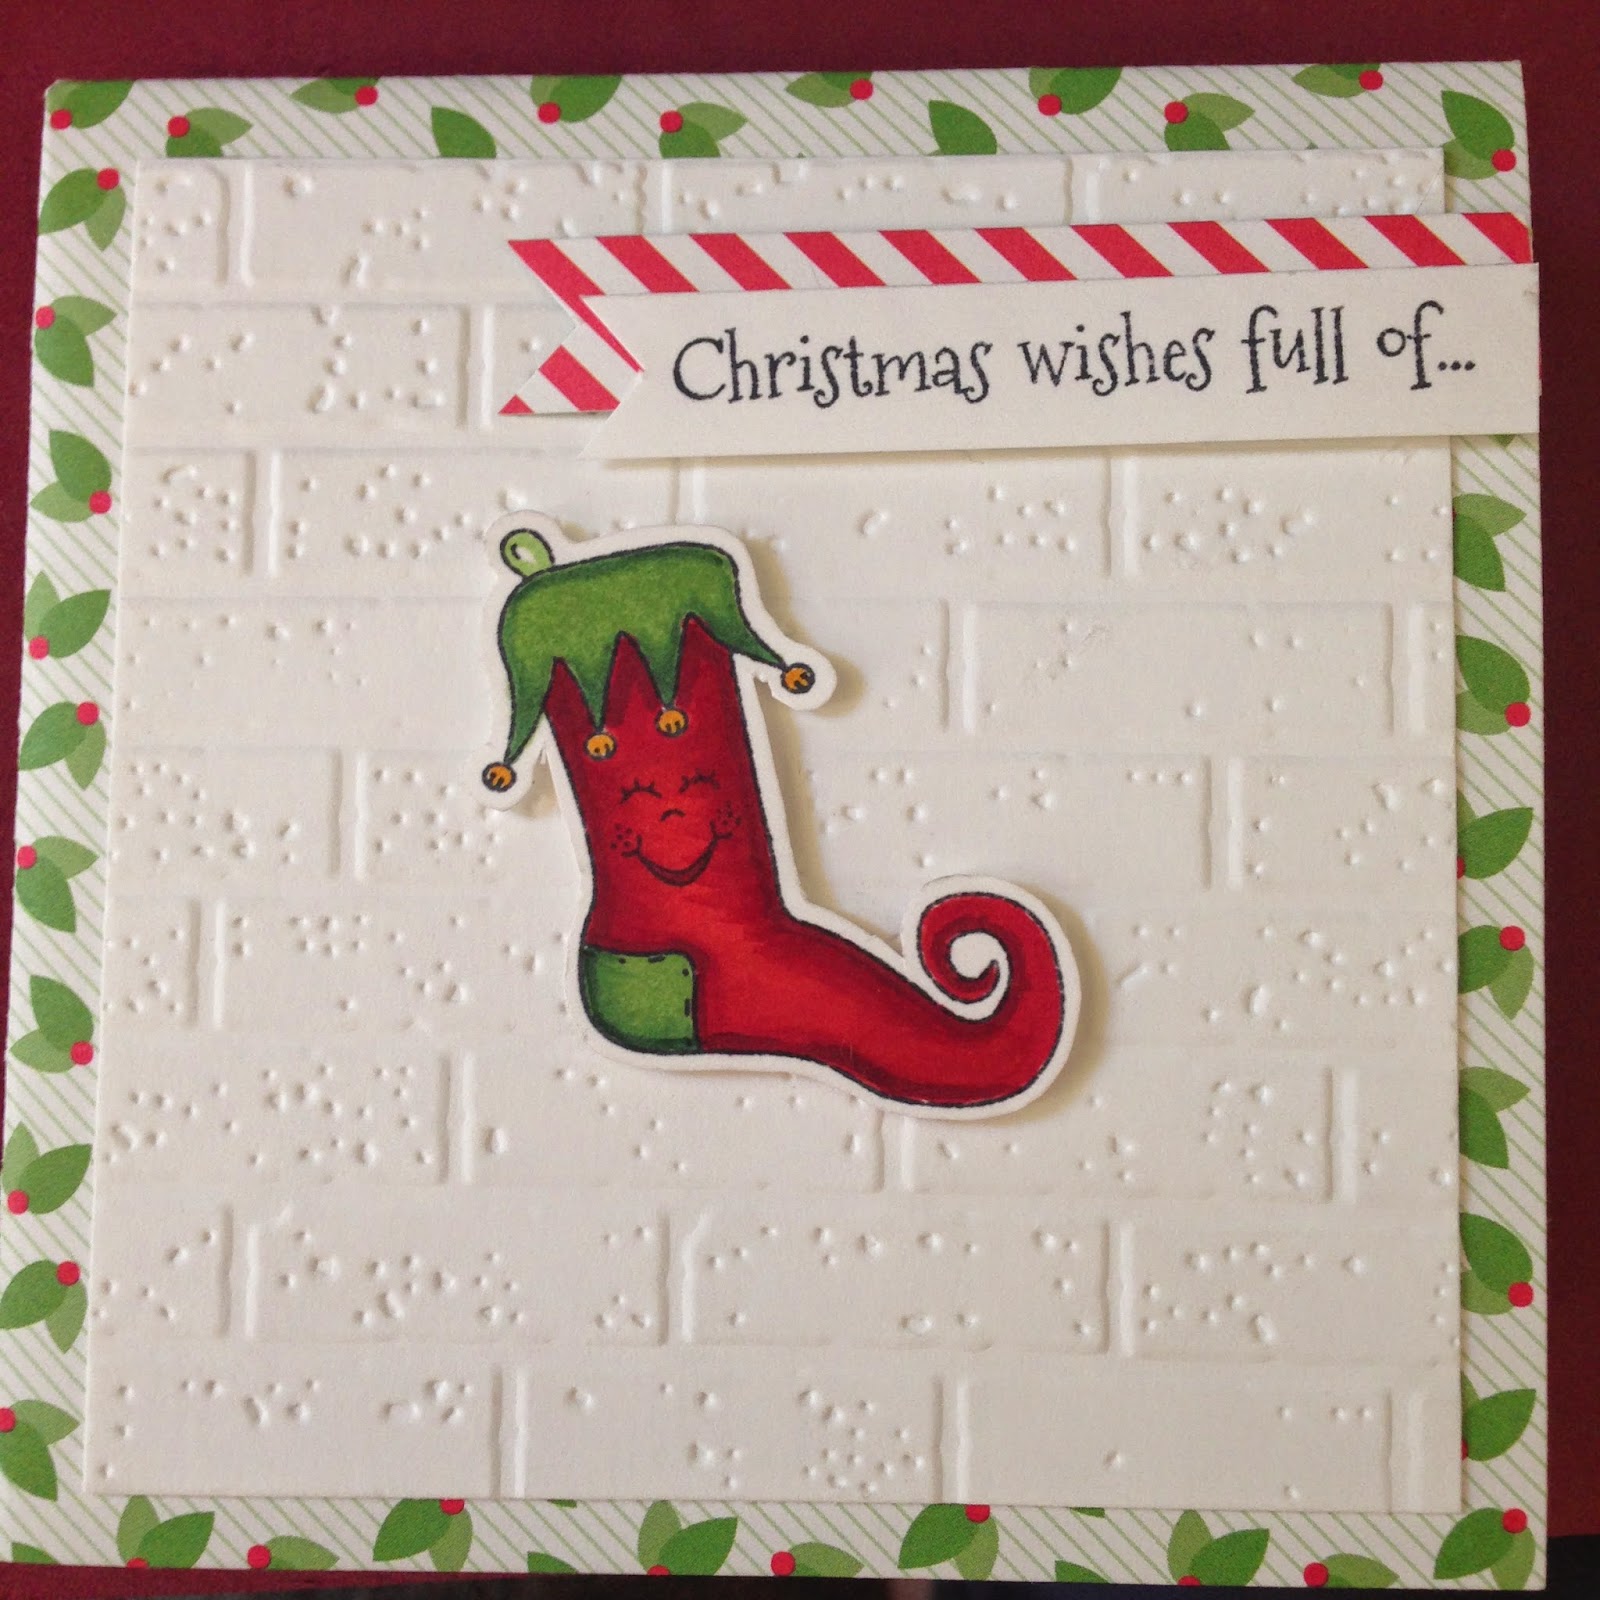
Here's a look at the front when folded...

Here is a look at the card as it is folding...
Pretty fun card, right?
Want to know how to make one? Keep reading...

Materials
- Lawn Fawn Double Sided Patterned Card Stock
- Neenah's White Card Stock
- Memento Dew Drop Ink Pads
- Copic Markers and Spica Glitter Pens
- Sakura White and Glaze Pens
- Spiced Sunshine Stamps (www.SpicedSunshineStamps.com)
- Bricks Embossing Folder
- The Robin's Nest Dew Drops Clear
- Rhinestones
- Fiskars Paper Trimmer
- EK Success Punch
- Scotch Double Sided Foam Adhesive
- Tombo Glue

Instructions
Cut a 12x12" Lawn Fawn double printed card stock down to 8x8" for card base.
Fold in half lengthwise, then open and fold in half again horizontally. Open and fold again in half diagonally. Open and take the corners that now have triangles in them and push their folds in towards each other. Push entire card down and run over folds with a bone folder preferably.

Cut 6 squares out of selected Lawn Fawn double sided card stock at 3.5", slicing 4 of these into half diagonally to create triangles. Cut one 3.5" square out of Neenah's white card stock to emboss with brick pattern for front of card. With card closed, adhere bricks to front center of card. Open card up and adhere 4 selected triangles onto the same side as front of card into the center of their designated areas. Turn over and adhere triangles and squares into their areas. (Keeping in mind that any papers with words on them should be double checked for proper placement if you fold up the card.)

Stamp Spiced Sunshine Stamp (Dear Santa Set) stocking and color in with Copic Markers. Stamp stocking face and adhere to center front of card with double sided foam adhesive. Stamp sentiment on white card stock and cut out into banner shape on left side of sentiment. Using matching patterned paper, cut a banner out in same width as sentiment, but just a tiny bit longer. Adhere patterned paper banner to card using double sided foam adhesive. Attach sentiment to this banner with glue, offset a bit.

Stamp Spiced Sunshine Stamps Jolly Holly sentiment (Jolly Holly Set) and adhere to top left square on inside of opened card. Using Memento Dew Drop ink pads, create two leaves using Baboo Leaves, New Sprout, and Pear Tart by stamping the ink pads directly onto white paper. Stamp the two darker inks first as two leaves, then stamp lightest ink over the first two. Fussy cut. Color 3 clear Robin's Nest Dew Drops with Red Copic ink. When dry, adhere leaves and dew drops to center of top square where Jolly Holly sentiment was placed.

Using Memento ink, stamp Spiced Sunshine Stamps (Joy, Love, and Peace Set) tree sentiment in green, stamp the star on top in yellow, and the tree trunk in brown. Color the star in with Copic Markers let dry. Using a yellow Spica Glitter pen, color in the star again and let dry. Once dry, color over the glitter with a Sakura Clear Glaze pen to seal in the glitter. Fussy cut and add rhinestones. Adhere to bottom triangle of top right inside of card. Make sure to only place glue below the fold line.

Stamp Spiced Sunshine Stamps Sugar n' Spice sentiment (Gingerbread Kids Set) using Memento ink, punch out with fancy punch then trim with paper trimmer to fit upper left triangle on bottom left corner. Adhere in place. Stamp Spiced Sunshine Stamps Gingerbread Girl (Gingerbread Fun Set) on white card stock and again on patterned paper for her dress. Color girl with Copics E13, E15, E17 then stamp on face. Cut out dress portion on the patterned paper with the icing on her arms and below the icing at her legs. Color icing white using Sakura White Pen. Adhere dress to girl when white dries. Stamp hair on white card stock and fussy cut. Add rhinestone to base of pony tail and color with green Copic. Adhere to head of gingerbread girl. Stamp pocket, fussy cut and adhere to dress. Stamp scarf, color with Copics G40, G43, G46 then fussy cut, and adhere to girl (hiding the cuts of the paper pieced dress). Adhere girl to center of triangles on bottom left of inside of card, only applying glue to the bottom portion of the girl below the center fold of the triangles.

Carefully refold the finished card!


Entering into these challenges:
http://craftyhazelnutschristmaschallenge2.blogspot.com
http://christmascardchallenges.blogspot.com/2014/10/challenge-45-layer-it-up.html

Saturday, August 23, 2014

Owl Birthday Card Using Spiced Sunshine Stamps

Hello Sunshine! Here's a fun birthday card for all of you OWL lovers out there! Using the current Peachy Keen Challenge, I came up with this fun birthday card. I turned the sketch upside down on this one and moved the sentiment a bit to make room for my dew drops. 

Here's a look at the inside of the card:

And here's a picture of the finished card:

I sanded the card down for a different look. Notice how the sentiment follows the edge of the circle? I love that you can bend the stamp a bit to get a different look. 

Materials Used:
Neenah Cardstock
My Minds Eye
Spiced Sunshine Stamps
The Robins Nest Dew Drops


Wednesday, August 20, 2014

Joy Love Peace Christmas Tree

Happy Thursday crafty pals! Today I'd like to share a sneak peek for Spiced Sunshine Stamps next release. I decided to get a jump start on my Christmas cards this year, with this adorable sentiment tree!
I cut my card base then cut the dotted patterned paper a bit smaller than the face of the card. I inked my tree image using 3 different color greens. I stamped my tree image, stamped the trunk bottom center, and cut it to size. I stamped the star twice. Once on the top of the tree then again on patterned paper. I cut the star out on the inside of the line so it could fit inside the stamped image on the tree (use double sided foam adhesive for depth...I forgot to). I add my dew drops and a twine bow to finish off the card. 
Supplies Used:
Spiced Sunshine Stamps
DCWV Spring and Summer Stack
The Robins Nest Dew Drops
The Twinery Twine
Neenah Cardstock
Memento Ink

I'm entering this card into these challenges:

Christmas Card Challenge


Thanks for stopping by!


Sunday, August 17, 2014

You've Been Boo-ed! Bag

Hey crafty friends! Today I'd like to share a fun treat bag I made for Halloween...it's a BOO BAG! I love getting to spread fun during Halloween and this is a great way to do it!
Supplies Used:
Cricut Cart Wrap It Up
Trick or Treat paper by Michelle Coleman
Neenah Cardstock
Lawn Fawn Trimmings
Copic Markers
Peachy Keen Stamps (PKSC-32 and PK-1418)
Digi Digi Doodle BOO Greeting Digi (To be released next month)


Thanks for stopping by!


Friday, August 15, 2014

Happy Birthday Lorie!

Hi crafty friends! As most of you may or may not know, I'm a hard core Peachy Keen fan...very much addicted! I really am in need of an intervention program!  And right now a PKS gal is doing some celebrating! With some secretive work from the Peachy Queen herself (Kathy), this Birthday Blog Hop became possible! 

Having said that...This week a PKS member, I won't name names, (ahem....Lorie...shhh!) celebrated her 50th BIRTHDAY! Being the PKS fan that I am, you are probably wondering why I didn't use my PKS for Lorie's card. Well, I can explain...the answer is...I just couldn't decide what stamps to use! I sat for days trying to decide. I would take out sets, and lay em out then stare blankly at my craft table. I'd put em away and then repeat that process. For days...Then it hit me...keep it simple, use one of my own images and sentiment designs, and include all my favorite crafting embellishments on it!

Here's the front of the card:

As you may or may not be able to see...My favorite crafting items are Copics, embossing (on white cardstock), glitter (bees wings), twine, banners, and Dew Drops. I was able to get all of them onto this card! Lol!

Here's a look at the inside sentiment:
Don't know if this card made it's way to Lorie in time for her birthday, since it was really me racing against the clock trying to decide! But there ya have it! Happy 50th Birthday my PKS pal!

Images and Sentiment are from Digi Digi Doodle by Thia Gielow.


Thursday, August 14, 2014

Stitched Stamp Fun

Hi crafty friends! The new Peachy Keen sets are here and I've paired it with some Spiced Sunshine Stamps to spice up my card with stitching. Since I love how stitching looks on cards, I created some stitched stamps to save time and get those perfect lines. If you'd like to check them out, visit my website at www.spicedsunshinestamps.com

Since I have a friend who loves Halloween whose birthday is coming up next month, I decided to create this card for her using PKSC-32 August 2014 set by Peachy Keen. I am in love with Kathy's stamps...they are cute, fun, and the polymer is the best out there hands down!

Here's my card:

Friday, July 11, 2014

Snowmany Faces

Hey crafty friends! I just received a set of stamps from my monthly Peachy Keen Stamps Club Membership (set PKSC-31 July) and I had to start playing with them! (I love the set number 31 July! My birthday! Lol!) They are so cute (as usual)! Here's my first finished mini card. I love it so much I'm putting together another one that's A2 size in a trifold for OWH.
Materials used:
Peachy Keen Stamps
Neenah Cardstock
Lawn Fawn Cardstock
Robins Nest Gems
Cuttlebug Snowflake Folder
Copic Markers
Gelly Roll White Pen

I just love these stamps, cute designs and most important, awesome quality! Thanks Kathy and the PKS team! 

I hope my creation inspires you to start your holiday card crafting projects or...to make cards to donate to OWH!
-Thia

Saturday, July 5, 2014

OWH VCMP Christmas Card with Texture

I just found out that OWH is in the middle of their 4th of July Virtual Card Making Party! So...I haven't started at the beginning, I'm starting in the middle and I'll be jumping around. Here's my first card:

It's a trifold card with texture in the form of glaze pen on the sentiment, feet, belt, berries, and eyes. More texture with Liquid Pearls on the hat fluff. And my 3rd type of texture in the form of Dew Drops.

Image and sentiment is a digi from Digi Digi Doodle (an Etsy shop with a few cute digis for Christmas).

Papers are Neenah card stock and Lawn Fawn.

The faux stitching is a stamp from Spiced Sunshine Stamps. ( www.spicedsunshinestamps.com)

I colored the image in with Copic Markers, and realized I need to pick up some refills for some of my colors (like the blues for my sky) as I ran out in the middle of this image. I can tell...can you?

Oh, there's one thing I LOVE about this card...

It stands up to display the image in a cute way. 

Thanks for stopping by! Happy card making!


Tuesday, July 1, 2014

DT Call Submission


Hey there friendly followers! So there's a DT Call out for "Darker Side" projects. That sounds like a fun challenge. So, I'm going to apply. 

Monday, June 23, 2014

Getting Crafty for OWH

Hi my crafty followers! Happy Summer! As some of you may know, it's that time of year again, where I start creating cards for Operation Write Home and mail them off before my birthday. I try and send at least as many as I am old. That'll be 43 cards this year in the mail to OWH by The end of July! Which leaves me crafting at least one card per day! Here's what I've got so far...


Stamps used:
Peachy Keen Stamps
BMC Crafting Station Stamps

Papers used:
Recollections
DCWV
Lawn Fawn

Thanks for stopping by! Be sure to back for more of my OWH creations!
-Thia


Friday, June 20, 2014

Sad She's Moving Card

Hey there. I've been so under the weather these past few weeks...this card could be a get well card, but nope. It's a sad to see ya go card. My doctor is moving. I'm so sad, so I made her this quick card based on the Peachy Keen Color Inspiration challenge.
Yup, that's an actual piece of tissue coming up out of the box! Hope you enjoyed this quick card! Happy Summer!

Thursday, May 8, 2014

Cuttlebug Folder Art Deco

Yesterday I decided to try something new when using my Cuttlebug Mickey Mouse folder. And I love love LOVE how it turned out...
With my Momento Ink Pads (Regular Black Pad and Teardrop Red, and Yellow pads), I colored the image. I placed the embossed image onto the black ink pad and rubbed the back of my image with my finger. Then I moved the paper a bit and repeated. I continued this until I was happy with the black color/outline. Let it dry then used my red ink pad to outline the white cardstock (which I used a Nestabilities die for the pretty shape). I then dabbed the ink with the tip of the teardrop right onto the image for his shorts and tongue. I did the same for his yellow shoes. I placed him on different colors of cardstock using double sided foam adhesive, creating layers for the Shadowbox. It came out really cute. And is perfect for adding trinkets to. 

To learn about more fun ideas such as this, get signed up for the Inky Crafting Club! For only a few dollars each month, you receive fun digital images, sketches, and great crafting tips! (How To's, Copic Coloring, Card Folds, etc.) Please visit the SHOP to sign up. And...if you don't have PayPal, you can mail in a check for a years subscription!

Saturday, April 19, 2014

Spring and Easter Craft Fun Blog Hop

Hand crafted Easter and/or Spring decorations, treat boxes, and cards can be simple and fun! Make them with kids or on your own! Hop along with the Blue Moon Creation Crafting Station Get Inky Design Team this weekend and see some wonderful creations to inspire YOU to get your craft on this Spring!

If you are here for the HIPPITY HOPPITY BLOG HOP 
please click HERE to complete that hop.
(Then if you'd like MORE fun, return to Thia's Blue Moon Creation blog to get back here to participate in this GREAT hop too!) 
Now, before you get to hopping along the bunny trail, let's talk BLOG CANDY!!! Our sponsors have provided us with a few fun goodies for you! So, in order to be entered to win some BLOG CANDY there's TWO things you must make sure to do:

1- Subscribe/Follow each blog along the hop. (Required)


2- Comment on every blog post along the hop for the most chances to win! (Required)


3- Extra entries for those who are our Facebook followers. To find us on Facebook, check out our links section and click on Facebook link then like our Pages. (Optional)

Welcome! If you arrived here from Theresa The Scrapbooking Queen's Blog you are in the right place. If you are just joining us, please make sure to start at the challenge blog for some great fun!


I created a two fun spring cards to wish somebody a Happy Easter/Spring and/or a Happy Birthday.

Supplies Used:
Get Inky Stamps Hoppy Spring and Sitting Backside Bunny Digi
Robin's Nest Dew Drops
Craft Ball
Lawn Fawn Paper
Card stock from stash


Supplies Used:
Get Inky Stamps Hoppy Spring and Rainbow Of Smiles
Buttons and Card Stock from my stash
Lawn Fawn Paper
Copic Markers

Thanks for hopping!  This is your FINAL STOP. We hope you enjoyed hopping along with us! Don't forget to join our current challenge DIE CUTS!

Our Sponsors & Prizes:


-One Crafty Card Gallery App
-One Challenges and Sketches App by Crafty Card Gallery 


- One Scrapbooking Queen's Royal Prize Pack


- Three BMCCS Inky Subscriptions (Year)
- One BMCCS Get Inky BRAND NEW 4x6 Rainbow Stamp Set
- One BMCCS Crafty Treasure Box


Thanks for joining for us today. 
Here's the line-up if you get lost along the way!

Line-up:


Friday, April 18, 2014

Hippity Hoppity Easter Hop


Hippity Hoppity all along the bunny trail! you are almost done! If you arrived from Dianna's Blog, you are in the right place! If you have just arrived here, you'll want to start at the beginning, unless you are looking for the Crafting Station Get Inky Spring and Easter Hop.

Make sure to become followers (if not already) of the designers blogs along the hop, and leave a comment on each blog to be eligible for the fun blog candy. What's up for grabs? Great question! 

Check out these fun things...

Close To MY Heart Chocolate Affair Stamp Set.
A set of candy stamps for the SWEET Easter season! $17.95 value.
6x8" Hoppy Spring Stamps
manufactured by Peachy Keen Stamps for BMCCS Get Inky Stamps $24.99 value


There's also 3 Spring Digi Bundles available from Blue Moon Creation Crafting Station.
Which can have you crafting cards like this one:


My Hippity Hoppity Project:


I created a simple Easter Candy Purse using paper punches and a paper cutter. The Digi Image on the back is Chick In Egg (by Blue Moon Creation Crafting Station). I colored it with my Copics and then fussy cut it. It's an easy image to fussy cut. Used another paper punch for the flower too. Used a button and a Robins Nest Dew Drop for the fake snap. Used some bakers twine to create a handle by braiding 3 pieces together. Used a hole punch to create the spot for the handle to tie on. These are also fun to make on a much smaller scale for the miniature candies. Use them as thank you's or advertisement. Another fun thing is the kids can even make these. Great for Valentine's Day treats too! (Check out the BMCCS Inky Moonbeams Stamp Club for more fun crafting ideas.)


That's it for me. Next head on over to Eva's Blog...but ONLY after following my blog
AND leaving a SHORT but SWEET comment so you won't miss out on any blog candy.
(I'm also giving out 3 Inky Moonbeam Stamp Club Subscriptions good for one year.)

The Hop Line-Up


Friday, April 11, 2014

Spring Action Wobble Chick In Egg Card

I wish it felt like SPRING! It's been in the 90's this week...sneak peek of summer, I guess.

This fun Action Wobble card was created with stamps from Peachy Keen AND Get Inky! I had so much fun using the current PK Sketch Challenge, Get Inky Challenge, and the Action Wobble Challenge to come up with this cute SPRINGY creation.


Stamp Sets Used:
Peachy Keen SOTM March 2014
Get Inky! Stamps by BMCCS Hoppy Spring 2014
Get Inky! Stamps by BMCCS Rainbow Of Smiles 2014 (sneak peek)

Papers Used:
DCWV
Neenah Cardstock

Other Items:
Tombow Glue
Momento Ink Pads
Double Sided Foam Adhesive
Copic Sketch Markers
Oval Paper Punch

Thanks for stopping by! If you can, come back next weekend for a BLOG HOP!


Friday, February 21, 2014

Button Time!

A new digi and stamp set is in the works because of this button challenge that just started on our Get Inky! Challenge blog. It's hard for me to decide on the size of the set, I love big sets but I think folks like smaller sets. Something about the cuteness of small sets? Anyhow...

Get out your buttons and join our button challenge, you have until Wednesday the 5th to link up with us! (To get to the challenge blog, click on link at top side under links.) 

Have a great day, thanks for stopping by! Now go get your craft on!

Tuesday, February 18, 2014

Hoppy Spring Release!

Hey there my Moonbeams! Are you ready for some awesome news? The Get Inky! Hoppy Spring Stamp Sets have arrived! Look at this cute card I created using 2 Get Inky! Sets, a Peachy Keen Stamp, and my DCWV cardstock...
I combined two challenges together to come up with this card. The Peachy Keen Photo Inspiration Challenge, and the challenge at Hiding In My Craft Room to use x3 patterned papers. 

The inspiration I found in the PK photo was the patterns and colors of the tapes. Lots of lines and dots. I used the flower from this months kit as the center of my flower.

The inspiration from the challenge at Hiding in my craft room was the idea of 3 patterned papers and their mention of their sponsor, DCWV.

The face, sentiment, and stitching are all stamps designed by me for the Get Inky! Stamp line (which is now manufactured by a stamp company with AWESOME quality!). They are a peach tinted photopolymer...need I say more? Truly the best quality stamp (in my opinion).

Thanks for looking! Have a great day!

Wednesday, February 12, 2014

Smiling Flowers!


As I was trying to get my almost 3 year old daughter ready for bed, she decided she needed to work on a card with me. It had to be a flower with lady bugs. Oh, perfect, I have just the thing in my peachy keen cottage cuts die cut stash! And, my new Get Inky! stamp set with stitched circles works with it perfectly! And since the new PK Stamps of the month arrived, I used some sentiments from it to create this card (with my daughters help, of course)! Oh and we used the PK Challenge Sketch too.

I colored the flower with my Copic Markers, and the ladybugs with my Glaze pens. Added a fabric flower for dimension along with double sided foam adhesive. It came together nicely...I think. Seemed easy too. And I love how the stitching really adds to it. 
If you are interested in getting your own set of stitched circles, the name of the set is BMC-0009 Circle of Love and it will soon be listed in our shop. I am so excited about these stamps because my dream for my manufacturer came true...my stamps have that peachy tint to them! Can you believe it?!? Have I mentioned I love Peachy Keen Stamps? They really are the best stamps out there! And now I can get my stamp designs made with that quality us Peachy Fans love! (The hard part is switching all my existing sets over! But it is soooo worth it!)

Have a great day! Thanks for stopping by!

Tuesday, January 28, 2014

Lawn Fawn's CHA Happy Trails Make and Take

Guess what I found at CHA...Lawn Fawn! I love their cute stamps, so I decided to quickly join in on one of their make and takes. Since the day was coming to an end, I quickly put mine together with the intent on finishing it at home. I finally did! Ironically, I finished it the same day I found out that their headquarters is located in my hometown...yup, I'm in trouble! Here's my finished card:
Soon my Crafting Station will carry their cute products...so if you need a Lawn Fawn fix, just contact me! Thanks for stopping by!